
10.0.0.1 – 10.0.0.0.1 Admin Login
10.0.0.1 is a private IPv4 address widely used as the default gateway for home and small office routers. It belongs to the Class A private address range (10.0.0.0 – 10.255.255.255) defined by RFC 1918, a standard that reserves certain IP address blocks exclusively for private networks, keeping them off the public internet.
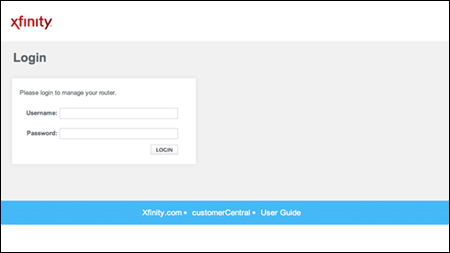
When you type http://10.0.0.1 into your web browser’s address bar, your browser connects directly to your router’s built-in administrative panel – a web-based dashboard where you can control every setting on your network.
Important: Do NOT type 10.0.0.0.1 — that is not a valid IP address and will not work. The correct address has exactly four octets: 10.0.0.1
Routers that most commonly use 10.0.0.1 include Xfinity/Comcast gateways, certain ASUS models, Apple AirPort routers, and some Cisco small business devices.
| Property | Details |
| IP Address | 10.0.0.1 |
| IP Class | Class A (Private) |
| Full Address Range | 10.0.0.0 – 10.255.255.255 |
| RFC Standard | RFC 1918 |
| Primary Usage | Router Default Gateway / Admin Panel |
| Protocol | IPv4 |
| Access URL | http://10.0.0.1 (use http, NOT https) |
| Common Brands | Xfinity, Comcast, ASUS, Apple AirPort, Cisco |
| Competing Default IPs | 192.168.1.1 / 192.168.0.1 / 192.168.100.1 |

How to Access 10.0.0.1 — Step-by-Step Guide
Accessing your router’s admin panel via 10.0.0.1 takes less than two minutes. Follow these exact steps:
Step 1: Connect to Your Router
Make sure your computer, phone, or tablet is connected to your router – either via a Wi-Fi connection or a physical Ethernet cable. You cannot access 10.0.0.1 from a device that is on a different network or connected via mobile data.
Step 2: Open a Web Browser
Open any modern web browser: Google Chrome, Mozilla Firefox, Microsoft Edge, or Safari all work fine.
Step 3: Enter the IP in the Address Bar
Click the address bar at the very top of your browser (where the URL appears — not the search bar). Type exactly:
http://10.0.0.1Tip: If the page does not load, try 10.0.0.1 without the ‘http://’ prefix, or try a different browser. Never use https:// – most routers don’t use SSL certificates on their local admin panels.
Step 4: Enter Your Login Credentials
A login dialog box will appear asking for a username and password. Enter your router’s admin credentials. If you have never changed them, use the default login printed on the sticker on the back or bottom of your router.
Step 5: Explore the Admin Dashboard
Once logged in, you will see your router’s full admin interface. The layout varies by brand and firmware version, but all routers share common sections: Wireless Settings, Security, Connected Devices, Port Forwarding, and System/Firmware.
How to Log In to 10.0.0.1 Admin Panel
Step 1: Confirm Your Router’s Default Gateway
Before attempting to log in, ensure your router uses 10.0.0.1 as its default gateway. Here’s how:
- Windows: Open Command Prompt > Type
ipconfig> Check Default Gateway. - Mac: Go to System Preferences > Network > Advanced > TCP/IP.
If the gateway isn’t 10.0.0.1, try alternatives like 192.168.1.1 or 192.168.0.1.
Step 2: Access the Login Page
- Open a web browser (Chrome, Firefox, etc.).
- Type
http://10.0.0.1or10.0.0.1in the address bar. - Press Enter to load the router’s login page.
Step 3: Enter Default Username and Password
Most routers come with pre-configured credentials. Below are common defaults:
| Router Brand | IP address | Username | Password |
|---|---|---|---|
| Xfinity | 10.0.0.1 | admin | password |
| Cisco | 10.0.0.1 | admin | admin |
| Technicolor | 10.0.0.1 | user | user |
| Arris | 10.0.0.1 | admin | password |
| SMC | 10.0.0.1 | cusadmin | highspeed |
Note: Always change default credentials after setup to prevent unauthorized access.
Step 4: Configure Router Settings
Once logged in, you can:
- Change Wi-Fi password and SSID.
- Set up a guest network.
- Update firmware for security.
- Manage connected devices.
Common 10.0.0.1 Login Issues & Fixes
1. Admin Panel Won’t Load
- Cause: Incorrect IP address or slow connection.
- Fix:
- Verify the IP is 10.0.0.1 (not 10.0.0.0.1).
- Use a wired Ethernet connection for stability.
- Restart your router and device.
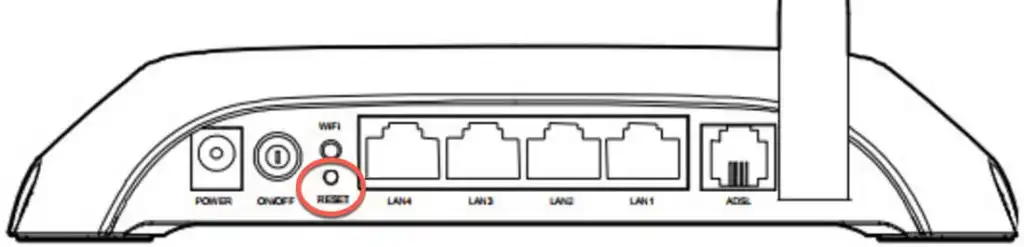
2. Forgotten Username/Password
- Fix:
- Check the router’s label for default credentials.
- Perform a factory reset using the physical reset button (hold for 10–15 seconds).
3. “Unresponsive Gateway Device” Error
- Cause: Hardware glitches or outdated firmware.
- Fix:
- Power-cycle the router (unplug for 30 seconds).
- Update firmware via the admin panel.
4. Incorrect Client IP Assignment
- Cause: DHCP conflicts or automatic IP assignment errors.
- Fix:
- Assign a static IP to your device.
- Renew the IP lease via Command Prompt (
ipconfig /renew).
Advanced Tips for Managing 10.0.0.1 Router
Secure Your Network
- Change Default Login: Use a strong password with a mix of letters, numbers, and symbols.
- Enable WPA3 Encryption: Protects against brute-force attacks.
- Disable Remote Access: Prevents external tampering.
Optimize Wi-Fi Performance
- Channel Selection: Use tools like Wi-Fi Analyzer to find less congested channels.
- Quality of Service (QoS): Prioritize bandwidth for streaming or gaming.
Monitor Connected Devices
Regularly review the list of connected devices in the admin panel to spot unauthorized users.
Why 10.0.0.1? Key Differences from Other IPs
While 10.0.0.1 is popular among Xfinity and LPB routers, other brands use different defaults:
- 192.168.1.1: Common for Netgear, Linksys.
- 192.168.0.1: Used by TP-Link, D-Link.
The 10.0.0.1 address falls within the Class A private IP range, which supports larger networks than Class C addresses (e.g., 192.168.x.x).
Frequently Asked Questions (FAQs)
Common Scenarios: 10.0.0.1 Real-World Use Cases
How to Set Up Port Forwarding via 10.0.0.1
Port forwarding lets you direct external internet traffic to a specific device on your local network — useful for gaming, running a home server, or accessing CCTV cameras remotely.
- Log in to http://10.0.0.1 and navigate to Advanced > Port Forwarding (exact name varies by brand)
- Add a new rule: enter the device’s local IP address, the port number(s) to forward, and the protocol (TCP, UDP, or Both)
- Save the rule and restart the router
- Test using a port checker tool like canyouseeme.org
Never forward port 80 or 8080 to a device — these ports are used by your router’s own admin panel, and forwarding them will break access to 10.0.0.1.
How to Change DNS Servers via 10.0.0.1
Changing your router’s DNS server to a faster, more private option can improve browsing speed and privacy for every device on your network.
- Log in to http://10.0.0.1 and go to Advanced Settings > DNS or WAN Settings.
- Disable ‘Automatically get DNS from ISP’ if enabled
- Enter your preferred DNS: Primary 1.1.1.1 (Cloudflare) / Secondary 1.0.0.1, OR Primary 8.8.8.8 (Google) / Secondary 8.8.4.4
- Save and reboot the router
How to Set Up a Guest Network via 10.0.0.1
A guest network lets visitors use your internet connection without accessing your main network, shared drives, smart home devices, or other computers.
- Log in to http://10.0.0.1 and navigate to Wireless > Guest Network
- Enable the Guest Network toggle
- Set a unique SSID (name) — keep it clearly different from your main network.
- Set a strong password and select WPA2 or WPA3 encryption
- Enable ‘Client Isolation‘ or ‘AP Isolation‘ to prevent guest devices from seeing your main network devices
- Save settings – your guest network is now live
Technical Background: Why Does 10.0.0.1 Exist?
RFC 1918 and Private IP Addressing
The Internet Engineering Task Force (IETF) published RFC 1918 in 1996 to address the problem of IPv4 address exhaustion. The document designated three IP address ranges as permanently private — meaning ISPs and internet routers will never route these addresses across the public internet:
- 10.0.0.0 to 10.255.255.255 (Class A – 16.7 million addresses)
- 172.16.0.0 to 172.31.255.255 (Class B – 1 million addresses)
- 192.168.0.0 to 192.168.255.255 (Class C – 65,536 addresses)
10.0.0.1 sits within the Class A private range, which technically allows a network to have up to 16.7 million host devices – far more than any home network needs. Router manufacturers that target enterprise or larger deployments often prefer the 10.x.x.x range for this reason.
NAT: How 10.0.0.1 Connects Your Devices to the Internet
Your router performs Network Address Translation (NAT) – it assigns private IP addresses (like 10.0.0.2, 10.0.0.3, etc.) to each device on your network, then translates all outbound traffic to appear as if it comes from a single public IP address assigned by your ISP. The router itself sits at 10.0.0.1, acting as the gateway between your private network and the public internet.
Conclusion
10.0.0.1 is one of the most important IP addresses in your home or office network. It serves as the digital front door to your router – the device that connects every screen, speaker, phone, and appliance in your space to the internet.
Whether you need to change your Wi-Fi password, block a suspicious device, speed up your connection with faster DNS, set up port forwarding for gaming, or secure your network against threats, the admin panel at http://10.0.0.1 gives you complete control.
The key things to remember: always access it via http:// (not https://), find your real gateway IP if 10.0.0.1 does not work, change your default credentials immediately, and keep your firmware updated. With this guide, you have everything you need to manage your network like a professional.

Janette Toral
Janette Toral is a Filipino digital media specialist, educator, and blogger known for her work in internet marketing and e-commerce education in the Philippines. She contributes content to pisowifipausetime.ph and writes practical guides on IP Router configuration, local network management, and WiFi connectivity, contributing to Philippine online business and technology communities.