
192.168.0.1 – 192.168.o.1 Admin Login
192.168.0.1 is the default gateway IP address used by popular router brands like D-Link, TP-Link, Netgear, Arris, and many others to access the admin panel. Through this address, you can log in to your router’s control panel and manage WiFi settings, change passwords, configure parental controls, update firmware, and more.
Common typing mistake: Many users search for 192.168.o.1 (using letter “o”) or 192 168 0 1 — these are the same address. Always use numbers: 192.168.0.1
What is 192.168.0.1?
192.168.0.1 is a private IP address that falls within the 192.168.x.x range reserved by the Internet Assigned Numbers Authority (IANA) for private networks. Unlike a public IP address (which is unique across the entire internet and assigned by your ISP), this address is only accessible within your local network.
Think of it as your router’s “home address” on your internal network. When you type 192.168.0.1 into a browser, you are not visiting a website – you are connecting directly to your router’s built-in web interface.
Why 192.168.0.1 specifically?
Router manufacturers choose a default gateway IP during production. The 192.168.0.x range is one of three private IP ranges defined in RFC 1918:
192.168.0.0 – 192.168.255.255 (most home routers)172.16.0.0 – 172.31.255.255 (enterprise networks)10.0.0.0 – 10.255.255.255 (large corporate networks)
D-Link and Netgear historically favor 192.168.0.1, while TP-Link and Linksys often use 192.168.1.1. Both are equally common; it depends entirely on the router brand and model.
How to Login to 192.168.0.1
Follow these steps to access your router’s admin panel:
- Connect to your network. Make sure your device (laptop, PC, or phone) is connected to the router. You can use an Ethernet cable (recommended for first-time setup) or connect wirelessly via WiFi.
- Open your web browser. Open any browser – Chrome, Firefox, Safari, or Edge. Do not use the search bar. Use the address bar at the top.
- Type the IP address. Type exactly:
http://192.168.0.1and press Enter. Do not typehttps://— most routers do not support HTTPS on the admin panel. If you typehttps://192.168.0.1you will get an error.
- Enter your login credentials. A login page will appear asking for a username and password. Enter your router’s credentials. (See the full default password table below if you haven’t changed them.)
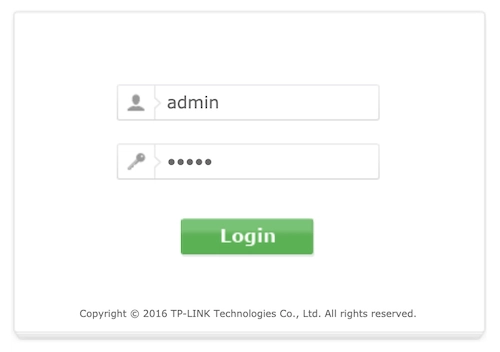
- Access the admin panel. After successful login, you will see your router’s dashboard. From here you can configure all settings.
Pro Tip: If 192.168.0.1 doesn’t load, your router may use a different IP like 192.168.1.1 or 10.0.0.1. Check the sticker on the back of your router for the correct gateway address.
Default Username & Password for All Router Brands
This is the most searched information for this topic. Below is the complete table of default login credentials for routers that use 192.168.0.1 as their default gateway:
|
Router Brand |
Default Username |
Default Password |
|
D-Link |
admin |
(blank/empty) |
|
Netgear |
admin |
password |
|
TP-Link |
admin |
admin |
|
Arris |
admin |
password |
|
AT&T |
admin |
attadmin |
|
CenturyLink |
admin |
admin |
|
Huawei |
admin |
admin |
|
ZTE |
admin |
admin |
|
Actiontec |
admin |
password |
|
Buffalo |
admin |
password |
|
Comtrend |
admin |
admin |
|
3Com |
admin |
admin |
|
Cisco (home) |
admin |
admin |
|
Belkin |
admin |
(blank/empty) |
|
Motorola |
admin |
motorola |
|
Sagemcom |
admin |
admin |
|
Tenda |
admin |
admin |
|
Zyxel |
admin |
1234 |
|
Billion |
admin |
admin |
|
Linksys |
admin |
admin |
Most common combinations across all brands:
- admin/admin — used by approximately 43% of routers
- admin/password — approximately 20% of routers
- admin / (blank) — approximately 17% of routers (just press Enter with no password)
Note: If none of these work, the password may have been changed by someone previously. See the reset guide below.
Router-Specific Login Guides
D-Link Router Login
D-Link is the most common brand using 192.168.0.1. To log in:
- Open browser → type
http://192.168.0.1 - Username:
admin| Password: leave it blank (just press Login) - Newer D-Link models (DIR-series) may prompt you to create a password on first login
- If blank password doesn’t work, try
adminas password
Popular D-Link models using this IP: DIR-300, DIR-600, DIR-615, DIR-825, DSL-2750U
TP-Link Router Login
Most TP-Link models default to 192.168.1.1, but several models use 192.168.0.1:
- Open browser → type
http://192.168.0.1 - Username:
admin| Password:admin - Newer TP-Link models (2020+) require you to create a new password on first setup — they no longer use admin/admin by default
- If prompted, create a strong password and save it somewhere safe
Popular TP-Link models using this IP: TL-WR841N, TL-WR940N, Archer series (some models)
Netgear Router Login
Netgear routers consistently use 192.168.0.1 as the default gateway:
- Open browser → type
http://192.168.0.1orhttp://routerlogin.net - Username:
admin| Password:password - Netgear also has a dedicated app (Nighthawk) for mobile management
- After login, change the default password immediately from Administration > Set Password
Popular Netgear models: WNR2000, R6300, R7000 Nighthawk, WNDR3700
Arris Router Login
Arris routers are common with ISP-provided gateway modems:
- Open browser → type
http://192.168.0.1 - Username:
admin| Password:password - Some ISP-locked Arris devices may show a limited interface – contact your ISP for full admin access
- Arris SURFboard models may also use
192.168.100.1
AT&T Router Login
For AT&T-provided routers and gateways:
- Open browser → type
http://192.168.0.1 - Username:
admin| Password:attadmin(some models use the WiFi password printed on the device) - AT&T U-verse gateways sometimes use
192.168.1.254instead
Common Mistakes: 192.168 o 1 and 192 I.168.0.1
Typing the IP address incorrectly is a common issue. Avoid these mistakes:
- 192.168 o 1: Replace “o” with “0” (zero).
- 192 I.168.0.1: Use numbers only—no letters like “I” or “l.”
Always double-check the digits!
Forgot Username or Password? Here’s Help
Check the Router’s Manual
Default login details are often printed on the router’s label or in the manual. Common combos include:
- Username: admin, Password: admin
- Username: admin, Password: password
Reset the Router
If you changed the password and forgot it, reset the router:
- Press the Reset button (on the back) with a paperclip for 10-15 seconds.
- Wait for the lights to blink, then try logging in with default credentials.
How to Change WiFi Settings
Change your router’s default password. This is a key step to keep your WiFi safe from intruders. The steps may vary by router brand, but the process is similar. The following guide provides a basic overview to help you get started.
How to Change WiFi Password via 192.168.0.1
Changing your WiFi password is one of the most common tasks performed through the admin panel. Here is how to do it:
- Open a web browser. Enter your router’s IP address in the address bar. It’s usually 192.168.0.1 or 192.168.1.1.
- Log in to the router’s web admin panel with your username and password. Default credentials are often “admin” for both the username and password. Sometimes, it’s “admin” for the username and “password” for the password.
- Access the Wireless Settings section. Next, go to the Wireless Security page.
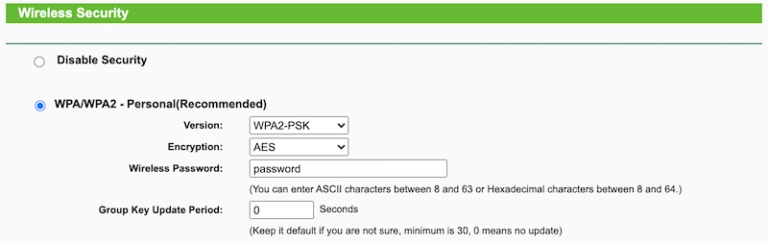
- Activate the “WPA/WPA2” security setting if it’s not on. Then, enter your chosen password in the provided field.
- Click Save or Apply. Your router will restart briefly and disconnect all devices. Reconnect using the new password.
Important: After changing your WiFi password, all connected devices (phones, laptops, smart TVs, etc.) will need to be reconnected with the new password.
How to Change WiFi Name (SSID)
Your WiFi name (SSID – Service Set Identifier) is what appears in the list of available networks. Here is how to change it:
- Launch your web browser and enter http://192.168.0.1 into the address bar.
- When prompted, enter the username and password. For most Routers, the default login details are:
- Username: admin
- Password: admin or password
- Choose Wireless, then select Wireless Settings from the menu.
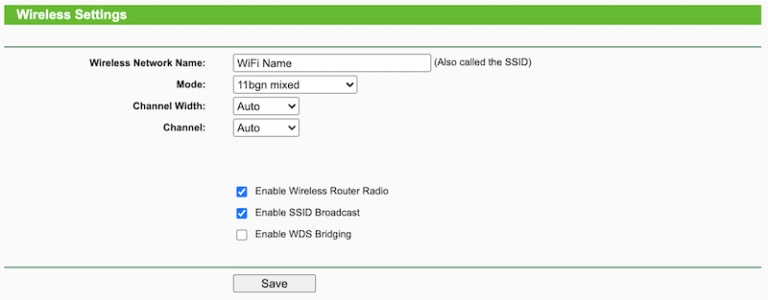
- Delete the current name and type your new WiFi name
- Click Save. Your router restarts and broadcasts the new network name.
Tip: Avoid using your name, address, or ISP name in your WiFi name – it gives away personal information to neighbors.
192.168.0.1 Not Working? Complete Troubleshooting
If you cannot access the admin panel, here are the most common causes and their fixes:
Problem 1: Typed the wrong address
The most common issue. Make sure you are typing 192.168.0.1 — not 192.168.o.1 (letter o), not 192.168.01 (missing dot).
Problem 2: Using HTTPS instead of HTTP
Most routers do not support HTTPS. Type http://192.168.0.1 (not https://). Some browsers auto-add https — type the full address including http://.
Problem 3: Your router uses a different IP
Not all routers use 192.168.0.1. To find your actual router IP:
- Windows: Open Command Prompt → type
ipconfig→ look for “Default Gateway” - Mac: System Preferences → Network → Advanced → TCP/IP → Router
- Android/iOS: Go to WiFi settings → tap the connected network → view details
Problem 4: Not connected to the right network
If you are connected to mobile data or a VPN, the router admin page will not load. Disconnect from VPN and make sure you are connected to your home WiFi or Ethernet.
Problem 5: Browser cache conflict
Try these:
- Clear browser cache and cookies
- Open an incognito/private window
- Try a different browser (Firefox instead of Chrome)
Problem 6: Router firmware issue
Restart your router by unplugging it for 30 seconds, then plug back in. Wait 60 seconds for it to fully boot, then try again.
Problem 7: Forgot router admin password (Factory Reset)
If you changed the admin password and forgot it, reset the router to factory defaults:
- Find the Reset button on the back of the router (usually a small pinhole)
- Press and hold with a paperclip for 10–15 seconds
- Wait for the lights to blink — this means reset is complete
- Log in with default credentials (see table above)
Warning: Factory reset erases ALL your settings – WiFi name, password, port forwarding rules, everything. Only do this as a last resort.
Advanced Router Settings
Once logged in to your admin panel at 192.168.0.1, you can configure several advanced features:
Port Forwarding
Used for gaming, remote desktop, or hosting servers. Go to Advanced > Virtual Server / Port Forwarding and add rules specifying which external ports map to which internal IP and port.
DHCP Settings
Your router assigns IP addresses to devices automatically via DHCP. You can:
- Change the DHCP range (e.g., 192.168.0.100 to 192.168.0.200)
- Set static/reserved IPs for specific devices (useful for printers and NAS drives)
- Find it under LAN Settings > DHCP
QoS (Quality of Service)
QoS lets you prioritize bandwidth for specific devices or applications. For example, give your gaming PC higher priority than other devices. Usually found under Advanced > QoS or Bandwidth Control.
MAC Address Filtering
Block or allow specific devices from connecting to your network using their MAC address. Found under Wireless > MAC Filter or Access Control.
Change Router’s Default IP Address
For extra security, change 192.168.0.1 to a less common address:
- TP-Link: Advanced > Network > LAN > IP Address
- D-Link: Setup > Network Settings > Router IP Address
- Netgear: Advanced > LAN Setup > IP Address
Update Router Firmware
Firmware updates fix security vulnerabilities and improve performance:
- Note your router’s model number (printed on the label)
- Visit the manufacturer’s website and download the latest firmware
- In the admin panel, go to System Tools > Firmware Update or Administration > Firmware
- Upload the downloaded file and wait for the router to restart
Security Best Practices
After accessing your router through 192.168.0.1, secure it properly:
- Change default admin password — The very first thing you should do. Go to Administration > Change Password.
- Use WPA3 or WPA2 — Never use WEP or “Open” (no security).
- Create a strong WiFi password — Minimum 12 characters, mix of upper/lowercase, numbers, symbols.
- Disable WPS (WiFi Protected Setup) — WPS has known security vulnerabilities. Turn it off under Wireless Settings.
- Enable router firewall — Most routers have a built-in firewall under Security settings. Keep it on.
- Disable remote management — Unless you need it, disable access to the admin panel from the internet. Usually under Administration > Remote Management.
- Update firmware regularly — New updates patch security holes.
- Change the default router IP — Changing 192.168.0.1 to something like 192.168.15.1 makes automated attacks slightly harder.
Frequently Asked Questions (FAQs)
Conclusion
192.168.0.1 is your router’s control center. Whether you need to change your WiFi password, set up parental controls, configure port forwarding, or update firmware – everything runs through this address. Bookmark this page so you always have the default credentials table and troubleshooting steps ready when you need them.
If your router does not respond at 192.168.0.1, try 192.168.1.1 – the other most common default gateway IP.